Tuesday, September 27, 2011

Number One!

Here again, this is me speaking from a Candid Portraiture and Journalistic Photographer’s perspective. 

The number one thing you can do to improve your photography: When you put your eye to the camera make your very first shot count. 

It’s like this: The moment you see an interesting shot, especially when trying to do Candid Portraiture, which is my area of interest, the best moment is already passing...so it's critical—extremely critical to get the first shot right—timing is everything.

Here are some tips to improve your first shot:

  • Support with your left—Use your left hand to support the lens or body, don't be afraid to post against something or use your body.
  • shoot with your right—Don't use your right hand to hold the body or lens while also trying to release the shutter.
  • squeeze it don't push it—Try to be smooth as you press or squeeze the shutter release. Let the one focus be pressing smoothly.
  • look at the whole frame—Look at the whole frame of your shot. Do as much in the lens cropping as possible to isolate what interested you initially.
  • have your exposure set—It's easy as you are moving back and forth from various light sources, or have shifting light, to forget, but be continuously checking or metering.
  • but just in case check your exposure—For me, this is a constant battle. Most of the time when I've shot in the field journalistic photos, the subjects are moving in and out of homes, light sources, and with various amounts of a-light. Check it. Seriously.
  • have your depth of field set—Have your depth of field determined if at all possible prior to picking up your camera.
  • focus—This can be the toughest thing, especially with very shallow DOF. Quickly focus.
  • exhale not inhale—Learn to exhale as you raise the camera up to your eye. Your body will settle down and rest and you will shake less.
  • relax—It can be tempting to want to rush to get a shot. I've done it soo many times only to have a shot that wasn't good anyway because I was in a hurry and didn't do something listed above. 
  • get used to it—You’ll never get ALL the good shots that come along. It just won’t happen. Stop and regroup. You can tell your “fishing story” about the “one that got away” later with all the other reminiscing photographers.
That said, with such a long list of considerations, you can’t sit there going through a checklist while life is passing by. It just won’t work so here are the top three: Focus, DOF, Exposure. That’s the big three overview IF the shot is interesting and you already know composition, story, etc.

Still, that can be difficult to do in the heat of the moment so the real way to improve your candid photography and journalistic photography is to become pre-emptive. Learn to see the photo developing BEFORE it actually does. I can’t teach this part, this comes from experience, the kind where there are lots of mistakes and missed shots. It’s knowing when to have your camera ready for THE shot and sometimes means not taking a shot at all if the moment has passed so you can prepare for the next one. 

Some tips for training yourself to become pre-emptive (interestingly, these things will also make for more interesting photographs):
  • know your subject—This is a more broad idea but encompasses the ones below. Study them, watch them, and wait for them. Be patient. 
  • convergence—Start to watch for things coming together in your subjects environment. This could be anything from a Taxi pulling up to the remote control for the T.V. or even another person. Where independent things come together inadvertently. 
  • relationship—Look for relationship cues and signals. Interactions can tell you a lot about a person and display many facets to their personality that you may not have considered.
  • peculiarities—Be on the look out for those things that make your subject unique. It could be a batch of freckles or a scar or a limp or a fondness for chocolate. Open up and watch.
Don't let the fact that you are shooting with a DSLR let you get sloppy or lazy. Hone your craft. That’s all I have to say about that. :) 

Let me know what you liked, what may have helped you?

Sean

Tuesday, September 13, 2011

Top Three Lenses

Here are my recommendations for shooting in the field or even on local shoots and getting great shots.

I personally thing it's all about the lenses. Less about the body but of course matching your body and your lenses will give you the most optimal tools. For example, I shoot with Nikon and shooting with a DX body and an FX lens will give you great shots still but they will not give you the full potential of the lens because your DX chip will automatically crop your photos. Not a huge deal but you just need to know. 

On the other hand, shooting with the less expensive DX lenses on an FX body will work but why would you do that unless, like me, you just don't have a choice yet.

Anyway, with that said, let's talk lenses.

First off... spend the money to get great glass, and plan on spending between $1500-$2500 a lens. You might get away for less but probably not.

For shooting candid portraits I recommend three great lenses that will give you a pretty good focal range and shoot fast. In general, I would recommend trying to purchase lenses that shoot at f2.8. For me, that's almost all I'll shoot at. I like a really shallow DOF in most cases. It's harder to shoot that way on the fly but when you get a great lens with great bokeh the images can be quite stunning. If you can get f1.4 or f1.8's that's even better but know that you are really going to have to perfect your focusing.

So my top picks as of this moment would be:

12-24mm at f3.5-f4.5 (Because we have it already but if you can swing it, and you shoot enough of it you might try  Nikon 14-24mm f/2.8G ED AF-S Nikkor Wide Angle Zoom Lens) (Nikkor)
50mm f1.4 prime lens. (Nikkor)
70-200mm f2.8 for those longer or tighter shots. (Nikkor)

Just be aware that the bigger the lens the more suspicion you'll be under for taking a photo. People WILL notice the 70-200 f2.8. It's a big lens. Beautiful and hard working but noticeable.

Those are my top picks.

©Copyright 2011 All Rights Reserved. Wycliffe Bible Translators, Inc.
Photo by Sean Stark


Monday, September 12, 2011

Wait for it...

Seriously... this is a simple idea but be willing to wait for the photograph to show itself. For a long time I felt pressure to shoot, shoot, and shoot some more, but learning to wait, as counter intuitive as it seems is a good skill.

Waiting is something that can pay for itself in the right circumstances. There’s no rush. Take your time, wait it out.

By waiting for a subject to relax or to be natural and just do there own thing, it is absolutely worth the wait. I may not take a photo for 30 minutes or more depending on the situation.

This is especially true as it concerns candid portraiture. Consider it—you’ve got the time.

©Copyright 2011 All Rights Reserved, Wycliffe Bible Translators, Inc.
Photo taken by Sean Stark

©Copyright 2011 All Rights Reserved, Wycliffe Bible Translators, Inc.
Photo taken by Sean Stark

Wednesday, June 29, 2011

Story!

The more interesting photographs to me, especially from a photojournalistic angle, tell a story. They aren’t portraits per se, they aren’t product shots, they aren’t locations, they aren’t landscapes, they aren’t art. They are stories captured in a 2 dimensional format, the script of which is only partially written, often without the beginning or the end—leaving the viewer to write the story or at least with the desire to know more.

Wednesday, June 22, 2011

Get Closer

One of the primary lessons I've had to learn is to not be afraid to be in the action. Too many shots I took early on just didn't work because I was too far away. They simply were wasted shots. Get comfortable being close and in the action.

When in doubt...get closer.


No—seriously. Get closer. Stop using a zoom, go to a prime lense 30mm or 50mm and take several steps closer.

Don't be intimidated by events and people, do you what you need to do. Your photos will look so much better, you'll be glad you did.

Tuesday, June 21, 2011

Photography Lesson As .asp

Just for fun I've decided to talk about a simple thing you can do to grow as a photographer but to stir it up a little, I decided to post it as .asp web development code. I know it's quirky but I'm cool with that.

<%
'Variables—these are the things that you need...
DIM Photographer
DIM Camera
DIM NoCamera
DIM Shooting
DIM NotShooting

IF Photographer=Camera THEN
   IF Camera=Shooting THEN
      response.write "Growth Can Happen."
ELSEIF Photographer=Camera THEN
   IF Camera=NotShooting THEN
      response.write "Growth CAN'T Happen."
ELSE Photographer=NoCamera THEN
   response.write "It's hard to call yourself a photographer."
END IF
%>


Basically, you need to have your camera with you first off, and then secondly, you need to be shooting. Study your photos, learn what you like, and shoot some more.


Enjoy :)

Monday, June 20, 2011

Getting the Right Gear—Lenses

For a photographer, gear can be like tools for a mechanic or tradesman. There's almost no end to what you can buy, and certainly no end to the need for upgrades, replacements, etc. It can cost thousands upon thousands to get into the high-end equipment.

The question you have to really ask is, "what am I shooting?" and then determine from there what you actually need. In this quick 10,000 foot view, I'm just going to address lenses and in particular the lenses I use, need, and want.

If you're doing documentary photojournalism for example, you may want three basic categories of lenses. A fast wide, a fast prime, and a fast Telephoto. What those exact specs are, may differ for you. I personally prefer VR or IS type lenses. For a few years I have been shooting primarily with a 24-80mm whenever possible.


Recently I've begun to use a wide angle lens to add more drama in limited instances, and I've found my 55-300mm VR to be a great lens for portraiture. It allows me to be close and get great detail without imposing myself on the subjects. This is allowing me the ability to get more natural candids because the subject isn't always aware that they are being photographed.


Even in the studio the 55-300mm has been really great for doing model shoots and portraits when combined with a strobe (my 55-300mm is still a very slow lens at 4.5). With a faster f2.8 or greater F-stop a telephoto lens could be an amazing field lens if it doesn't get too weighty.


Moving forward, the speed of the lens needs to be considered more heavily. I've done some shooting with a 30mm @ f1.4 and that has been wonderful, when I'm able to get the focus right (it's hard for me to see through the viewfinder and autofocus hasn't been my friend). But the speed of a 1.8 or a 1.4 has been instrumental on more than a few occasions of getting light in low-light situations where a flash and tripod are not an option.

Off camera remote flash can also be used if you have the time for the set up or if you are able, a battery pack strobe can be toted along.

Of course, with all of this, there is also the need to consider the DOF along with the light.

My Recommendations
AF-S VR Zoom-NIKKOR 70-300mm f/4.5-5.6G IF-ED Telephoto Zoom Lens
AF-S Nikkor 50mm f/1.4G Autofocus Lens

Thursday, June 16, 2011

Research for Photojournalism

My first overseas trip to do photograhy was complicated. I'd mostly shot studio photos (product shots) and fine art black and white photos up until that moment and even some low key portraiture.


My assignment was to do some photojournalism while on location in Indonesia. This was my first venture to south east Asia, let alone the first time I had worked in the role of photojournalist. The details of the assignment was for myself and a small team to go, do some interviews of pilots, and take photographs of the missionary aviation service they worked for, shoot photos of their planes, and specifically to take photos of a new aircraft that the mission was receiving that used jet fuel versus avgas.

I really knew nothing about shooting photos of aircraft but in my naivety I didn't see how it could be THAT different. Exposure is exposure and DOF is DOF, etc. I was wrong. Horribly wrong.


About 60% of that assignment was fine but the other 40% could have been much better....

Here are some key things I learned that would have helped the 40%:
1. You need to understand your subject well-before leaving. I didn't really understand issues of shooting aircraft.
Q1. For example, how close will pilots actually fly?
Q2. Will I be required to get in-flight photos?
Q3. What equipment will that require me to have?


A1. I can tell you that it's not very close. Their idea of close is like a mile away.
A2. In-flight photos were required.
A3. I should have brought a 400mm lens with stabilization or vibration reduction. VR for Nikonians.

Q4. What will the weather be like and how will that impact the equipment?
A4. Rain and humidity are not so good for camera equipment but you still have to shoot so bringing rain shrouds, spare bodies, spare lenses is a good thing. Also, being prepared to acclimate your gear to high humidity and temperatures before you need to shoot is a good idea. Moving your bag from A/C to the environment can cause a half hour or more delay while you wait for your lenses and sensors to clear up from the moisture that accumulates. Hot to cold and cold to hot and dry to moist and moist to dry changes impact your equipment.

Q5. Will the culture I'm shooting in be comfortable with me?

A5. Some cultural environments are not excited about outsiders or white people or Americans or all three. They are even less excited about you coming in with large, expensive cameras. Sometimes a smaller, less conspicuous camera is a better choice. 

Also consider that most cultures are made up of sub-cultures and they may not be homogenous in their acceptance or disdain.

Do some research. It'll just be better for you.

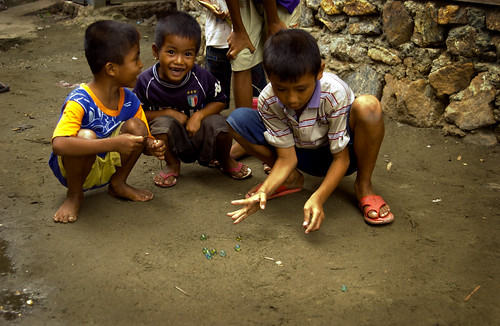
marbles 2

marbles 2 by silatjunkie
marbles 2, a photo by silatjunkie on Flickr.

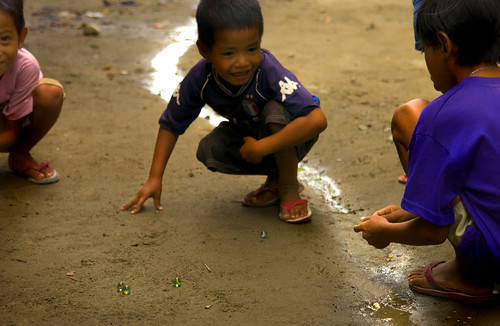
marbles

marbles by silatjunkie
marbles, a photo by silatjunkie on Flickr.

Example of a photo taken while on the Indonesia trip.

Tuesday, June 14, 2011

The Light

My fine art photography teacher used to say that photography was all about the light. Without it, you can't take a photograph-at least not a good one.

Ray Spicer was his name and he was responsible for shaping my viewpoint on photography, specifically black and white photography. He always said that without beautiful light you cannot have a beautiful photo.

Over the course of the past 20 years I've learned that his statement is only partially true. It is all about the light, but beautiful light is only somewhat relevant and depends more on the mood you are trying to establish within a photograph. Sometimes a less beautiful light can be used to create a more dramatic or gloomy mood.

Normally, I would recommend that the mood of your subject also match the mood of your light but that's not always necessary if you are trying to show a juxtaposition.

The light quality, type, warmth, coolness, brightness, flatness, etc., will absolutely play a part in the mood of your photo. Don't be afraid to try using other types of light, bounce light, fill light, flash lighting or available light to set the mood.